Cleaning up an old record
New Zealand's first LP "South Sea Rhythm"
16/11/2014
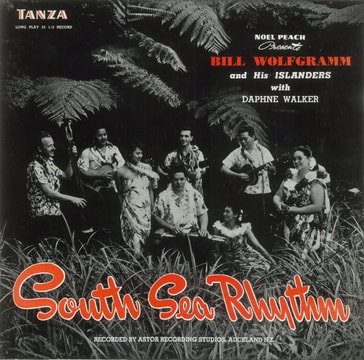
Click to embiggen.
|
This old 1956 record, which belonged to my parents, is sadly not in the best of condition. Although there are no skips, there are a lot of pops, crackles and distorted sections.
Side 2 is worst; I suspect that being the side with the vocal tracks, it got more plays. Because of its place in New Zealand recording history, I decided to try and create a cleaned-up version that would be a bit more listenable. (Don't ask why the title script slopes backward, I haven't a clue!) |
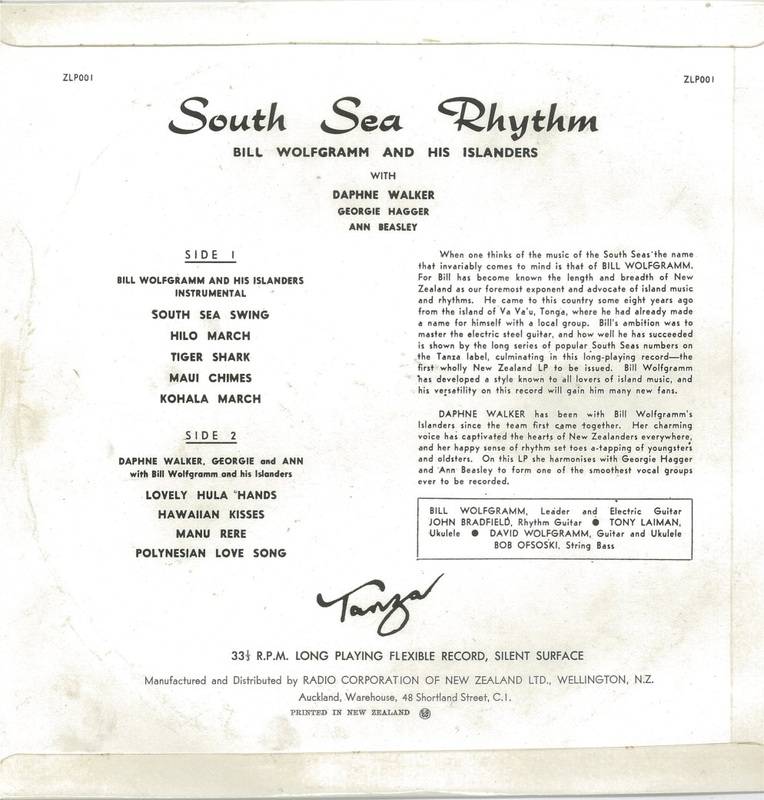
Click to embiggen.
|
The record has an interesting history. Wikipedia says: -
“During the 1950s when the transition from 78 rpm records to 33 rpm records was taking place, Bill Wolfgramm & His Islanders recorded South Sea Rhythm at Auckland's Astor Recording Studios. This album took four months to record and it featured Daphne Walker. It has the distinction of being one of the first long playing 33rpm records to be pressed in New Zealand. There is a belief by some that this album may have been the first.” I note that the TANZA label’s catalogue number is ZLP001, implying it is at least TANZA’s first LP. (TANZA is an acronym, it stands for "To Assist New Zealand Artists", see this comprehensive page on the Label at the AudioCulture website.) Details on the particular release I have a copy of are here at record cataloguing site Discogs:- Noel Peach Presents Bill Wolfgramm And His Islanders* With Daphne Walker – South Sea Rhythm |
I have seen a statement that the LP "...was actually a compilation of songs released as 78rpm discs for Tanza by Bill Wolfgramm and His Islanders. But Walker received co-billing..."
Wikipedia on Wolfgramm.
I note that it also says "He is the former leader of Bill Wolfgramm & His Islanders, a popular island band in New Zealand that played regularly at the Orange Ballroom, a historic dance venue in Auckland." (That is the venue that my grandfather's band also played, see my post "Restoring antique wind instruments" 01/10/2014).
Also on Bill: http://www.audioculture.co.nz/people/bill-wolfgramm
YouTube's only song from the album, "Hawaiian Kisses".
How the sound clean-up was done
Preparation of the record and making a digital recording
My first step was to clean the record, using plain old detergent, a soft and fine artist's paint-brush, and warm water rinse. Then I played it on my not particularly Hi-Fi old Hitachi turntable from the stereo system before my current 1990's model NAD system. The NAD came without a turntable.
The "Tape Out" of the NAD was fed to my desktop computer’s particularly Hi-Fi M Audio Audiophile 2496 sound card and recorded with a really great piece of audio freeware called Audacity, which I would recommend to anyone, and which has capabilities which will become apparent.
This resulted in two large 125 MB .wav files, one for each side of the record. There was no point in chopping up these files into individual tracks as there still remained the cleaning-up work to do, although in retrospect the files would have loaded faster to work on, but there is also the possibility of confusion and file overwriting with 11 separate files to work on.
The original .wav files were copied to my external hard drive as back-up. I anticipated the amount of work needed would warrant much care with back-ups as the work proceeded.
Overview of the clean-up process
The groove of an LP record is basically a wave modelling the changes in air pressure that are a sound. Deep sounds are from slow vibrations and require long, slow waves in the groove. High sounds are from fast vibrations, and require short fast-changing grooves. The playback needle is vibrated as it travels along the groove, but it is also vibrated by any dirt, dust or damage in the groove. The most usual and distinctive damage is the scratch, but a more subtle damage is caused by a blunt or dirty needle scraping along the groove and damaging the sides or peaks of the groove continuously.
Once a digital recording has been made, we have a set of numbers describing the shape of the groove at any point, and the shape can be shown on a computer screen and examined down to the smallest detail. Audacity was set to measure the height of the incoming electrical wave from the needle at 44100 times a second. This rate was chosen as it matches what is used to make CDs.
The central aspect of the clean-up is that Audacity allows you to change the wave in any way you like, as it only requires a change to the numbers describing it, something a computer is particularly well-suited for.
The Clean-up Process
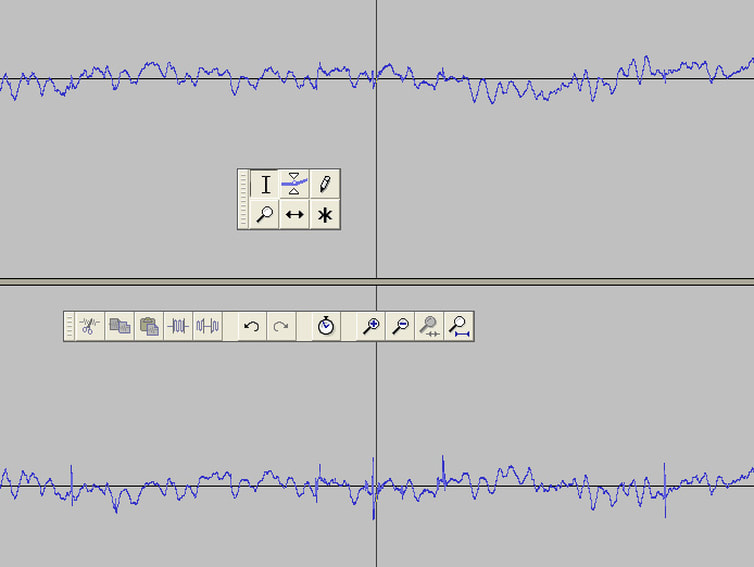
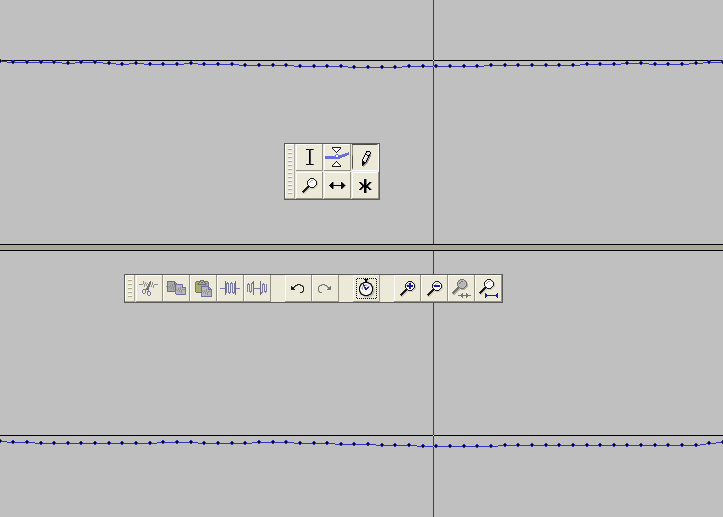
Unzoomed scratch
If you look at the above picture, you can see two jagged horizontal lines that represent the right and left sides of the groove, squashed in the horizontal direction. Next to the central cursor line you can see a section of the grooves with a sudden spike higher than the other peaks nearby. (There are a few other spikes visible as well.) Note that it is worse (bigger) on the lower line which represents the Left channel. This represents what would sound like a pop or click. It can be found in two ways: -
1. Simply listening as the display scrolls by, and stopping when a click is heard. This works where there are a few isolated and obvious defects from scratches or needle drops.
2. Where there is a lot of dust damage, which produces an almost continuous crackle, it is simpler to just zoom in on the wave form and scroll along locating the damage visually.
This next picture below shows the same lines stretched more in the horizontal direction, or "zoomed", if you will. Now the "spikes" appear as extended bumps.....
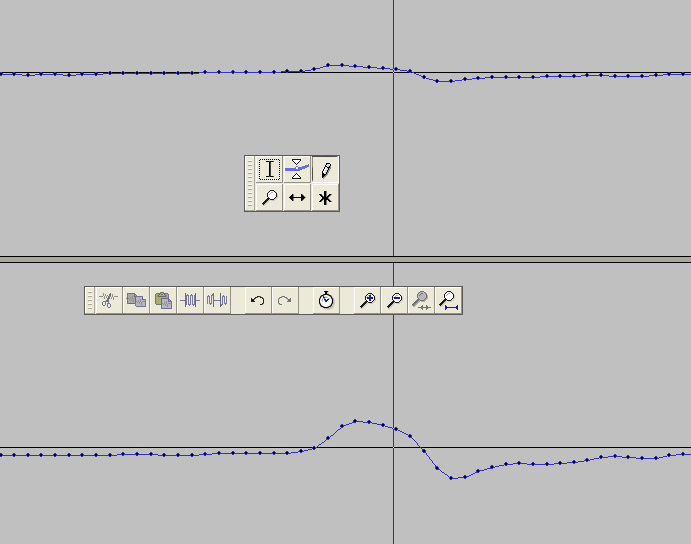
Zoomed scratch
If the user selects the "Draw" tool, by clicking on the little pencil symbol on the upper toolbar in the pic above, Audacity allows the use of the mouse to simply draw new lines eliminating the bumps, producing the edited result below: -
Very occasionally there can be damage that is so extensive it is not possible to tell what has been destroyed. Since most waveforms have a certain degree of repeating patterns, most of the time this damage can be remedied by inspecting the damaged area, finding a suitable start and end point for a section which is repeated preceding or following, then copy and pasting that repeated section over the damage. Audacity gives you a count of the number of samples in any section, thus you can match the pieces for length exactly.
This might seem like too much mucking about with the original, but when the example above is considered, the whole “bump” is 7.60280 to 7.60320 seconds, or 0.4 of a millisecond, roughly 20 samples. There is nothing the ear will pick up if a section that short is ever so slightly different.
Another approach is enabled by the fact that this is a mono recording, and thus left and right channels should be the same. If the damage is only on one channel, the damaged piece can be made the same as the other channel.
There is also a much more difficult type of damage, which took up most of my time in repairing. Note in the picture below, the lower unrestored copy has had the peaks and troughs of the waves damaged as the needle has perhaps pushed some dirt ahead of it, or perhaps a blunt needle has simply scraped the peaks off. The sound becomes distorted or “skritchy”. There is little that can be done except to laboriously re-draw the waves by hand with a mouse. Note that the tops of one channel and the bottoms of the other are damaged, thus each can be copied from the other. This process does produce a much cleaner sound, believe it or not.

Wave-peak damaged section with repair.
Note that in the capture above, I have included the time scale, at top. This section at 9 minutes 24 seconds is from .8480 to .8690 of a second, which equals 0.021 seconds/21 milliseconds long. You would have to edit 50 of these to fix one solitary second of damage!
Below I have included a full-screen capture to show my slow progress at a time I was full-on into editing the file. (click it to embiggen)
Below I have included a full-screen capture to show my slow progress at a time I was full-on into editing the file. (click it to embiggen)
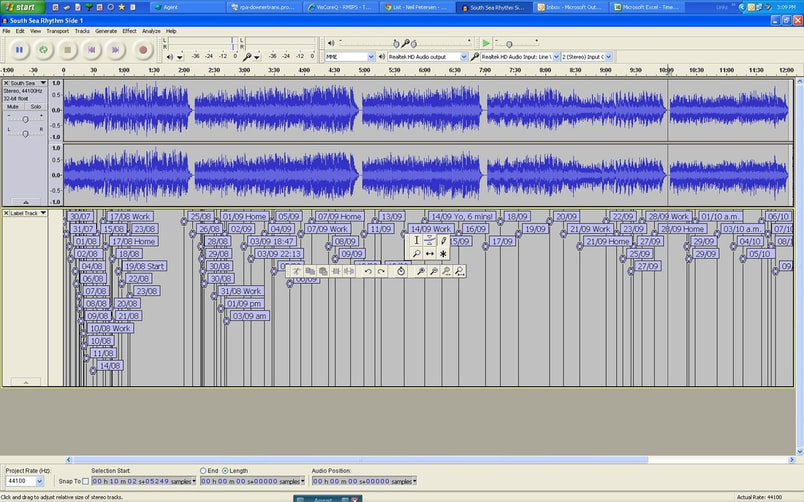
Full screen, side 1 editing, with label track expanded vertically.
I have enlarged and included the label track, where I dated my progress each session. Thus it shows work over the period 30/07 to 09/10, for the 12 minute LP side 1. Roughly 72 labels: 60 secs x 12 mins / 72 makes easy mental calculation of ten seconds of track average per session, usually an hour or two.
I don't think I would normally be quite that dedicated, but at the time I had just given up both alcohol and nicotine, and the work served as a diversion and substitute for time previously whiled away in my local.
I have taken the work to the stage where all clicks and pops I could hear have been removed, and the worst of the distorted sections have been cleaned up.
The editing has not been "finished", as there is almost no limit to how much longer I could spend trolling through the waveforms for damage. I have faced up to the law of diminishing returns, which says I will take ten ten times as long as I have already spent, just to get another 10% improvement, a hundred times as long to get the next 10% etc.
Copyright Issues
I have been keen to show others the fruits of my labours, but also have no wish to infringe on copyright or deprive anyone of income. To that end I have done some searching on the internet. I have been unable to find if there has ever been a re-release of this recording, let alone one on CD.
There was "The Great Kiwi Tanza Recordings", Various Artists, a triple CD released in 2004 by Rajon Music Group, cat. no. RTCD411. Rajon are no longer. The collection includes:
Disc 2-12 Tiger Shark - Bill Wolfgramm & Islanders 1955
Disc 3-4 Hilo March - Bill Wolfgramm & Islanders(Previously unreleased) (Obviously not true!)
There is some info out there on the TANZA 78s, for example ref. here at Discogs, which is a very comprehensive site where obsessive cataloguers share their addiction, to the benefit of the rest of us: http://www.discogs.com/label/209392-TANZA
My attitude is therefore that a few free copies to my friends/family are not going to be a revenue loss to anyone, and will perhaps contribute to the preservation of the music.
Below is how I dealt with presenting a CD burnt with the finished .wav files.
Presentation of the cleaned up recording
Rather than attempting to produce a realistic CD cover using the original LP's cover images above, I used Microsoft Word to make a cover, using a generic South Sea Island image and all the text from the original cover. I then had a play with all the fonts available in Word to try to match the many fonts used on the original cover (I just couldn't duplicate that backward slope of the title though!). I did use a scan of the angled handwritten Tanza logo on the back; that was a bit too hard to imitate. I also added a quote from and link to the National Library page on the history of recording in New Zealand for some background info.
I felt this approach made it obvious there was no intent to pass the cover off as a legitimate reissue, while still keeping some of the period feel. The results are below.
I felt this approach made it obvious there was no intent to pass the cover off as a legitimate reissue, while still keeping some of the period feel. The results are below.
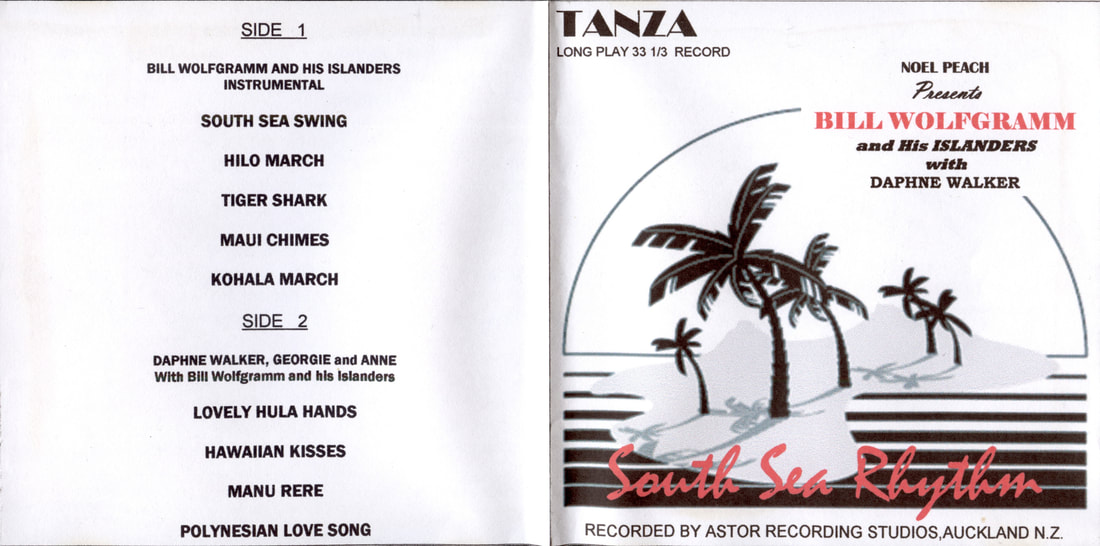
South Sea Rhythm CD Insert Outer

South Sea Rhythm CD Insert Inner

South Sea Rhythm CD Back
